> ## Documentation Index
> Fetch the complete documentation index at: https://docs.automatstudio.com/llms.txt
> Use this file to discover all available pages before exploring further.
# Character Studio
> Create and manage characters for your film
## Quick Start Video
***
## 2. Create a Character
Characters are the people who appear in your film. Each character can be reused across multiple scenes and shots, ensuring visual consistency throughout your production.
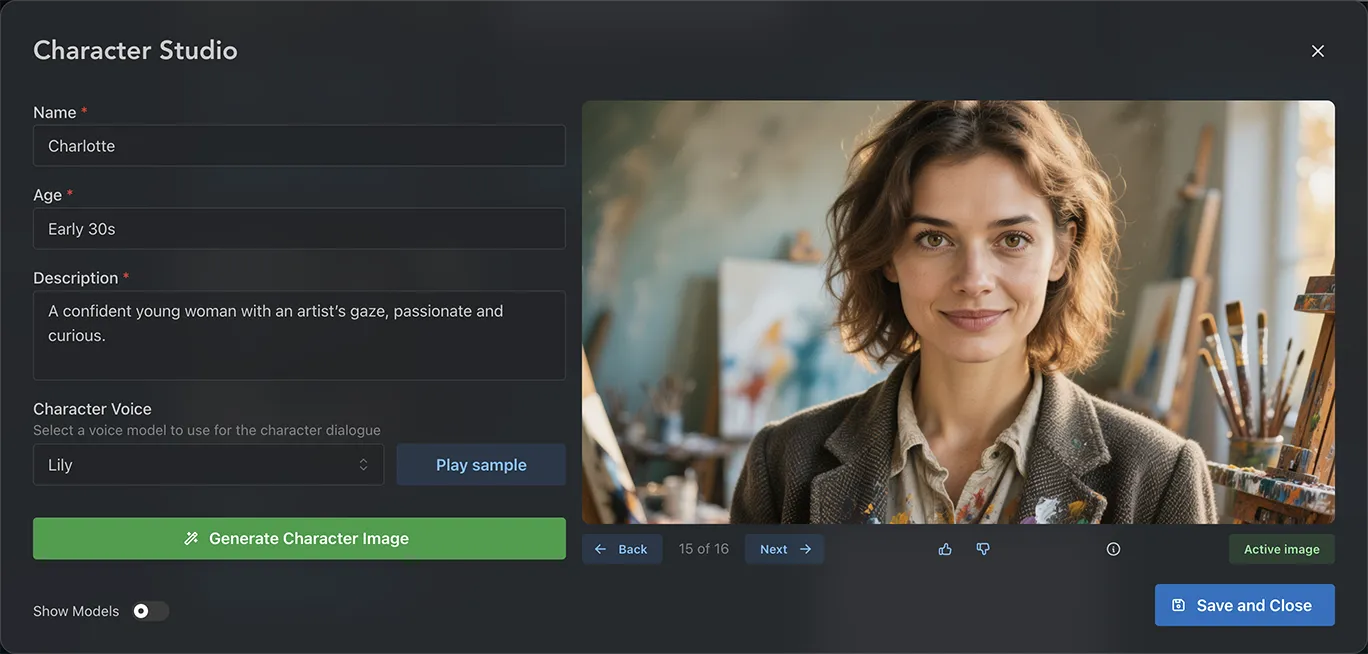
### Step 1: Enter Character Details
* On the Character Studio page, click **Create New Character**
* Enter the character's **Name**
* Enter the character's **Age**
* Write a detailed **Description** — include physical appearance (hair, height, build, distinctive features), clothing style, personality traits, and any other visual characteristics that will help the AI generate an accurate representation
* **Select a voice** — You can select the voice your character will have here. Click **Play Sample** to hear a sample. This voice will be used when generating dialogue
### Step 2: Generate Character Image
* Click **Generate Character Image** — the details you entered will guide the AI image generation
* Each character is generated as a **reference sheet** — three consistent views of your character (a front portrait, a side profile, and a full-body shot) in a single image
* Review the generated image and refine your description if needed
* Generate again until you're satisfied with the result
* Click **Save and Close** to add the character to your project
Automat uses your character's reference sheet when generating scenes and shots. The extra angles help keep your character looking consistent across different shot types and camera angles — including profile and wide shots, where a single front-on portrait tends to drift.
### Managing Generations
Once you've generated character images, you can manage them with the following features:
* **Navigate through generations** — Use the back and next buttons under the image to browse through all generated versions
* **Provide feedback** — Click the thumbs up and thumbs down buttons to give feedback on generated images
* **Active image** — The active image will be used when creating shots and scenes. New generations are automatically set as active
* **Set active image** — To set a different image as active, navigate to it using the back/next buttons and click **Set Active** underneath the image
* **Hide a generation** — Click the eye button to tuck away a generation you no longer want to see, without losing it. To bring it back, click the show-hidden (eye) button next to the navigation counter, navigate to the hidden generation, and click **Unhide**
* **Delete a generation** — Click the trash button to remove a generation permanently. If you might want it back later, hide it instead
**Advanced tip:** Try enabling "show models" to experiment with different AI models for varied visual styles and quality levels.
***
Previous: project setup
Next: create your location
 ### Step 1: Enter Character Details
* On the Character Studio page, click **Create New Character**
* Enter the character's **Name**
* Enter the character's **Age**
* Write a detailed **Description** — include physical appearance (hair, height, build, distinctive features), clothing style, personality traits, and any other visual characteristics that will help the AI generate an accurate representation
* **Select a voice** — You can select the voice your character will have here. Click **Play Sample** to hear a sample. This voice will be used when generating dialogue
### Step 2: Generate Character Image
* Click **Generate Character Image** — the details you entered will guide the AI image generation
* Each character is generated as a **reference sheet** — three consistent views of your character (a front portrait, a side profile, and a full-body shot) in a single image
* Review the generated image and refine your description if needed
* Generate again until you're satisfied with the result
* Click **Save and Close** to add the character to your project
### Step 1: Enter Character Details
* On the Character Studio page, click **Create New Character**
* Enter the character's **Name**
* Enter the character's **Age**
* Write a detailed **Description** — include physical appearance (hair, height, build, distinctive features), clothing style, personality traits, and any other visual characteristics that will help the AI generate an accurate representation
* **Select a voice** — You can select the voice your character will have here. Click **Play Sample** to hear a sample. This voice will be used when generating dialogue
### Step 2: Generate Character Image
* Click **Generate Character Image** — the details you entered will guide the AI image generation
* Each character is generated as a **reference sheet** — three consistent views of your character (a front portrait, a side profile, and a full-body shot) in a single image
* Review the generated image and refine your description if needed
* Generate again until you're satisfied with the result
* Click **Save and Close** to add the character to your project