> ## Documentation Index
> Fetch the complete documentation index at: https://docs.automatstudio.com/llms.txt
> Use this file to discover all available pages before exploring further.
# Location Studio
> Create and manage locations for your film
## Quick Start Video
***
## 3. Create a Location
Locations define where your scenes take place. Each location can be reused across multiple scenes, saving time and maintaining visual consistency throughout your film.
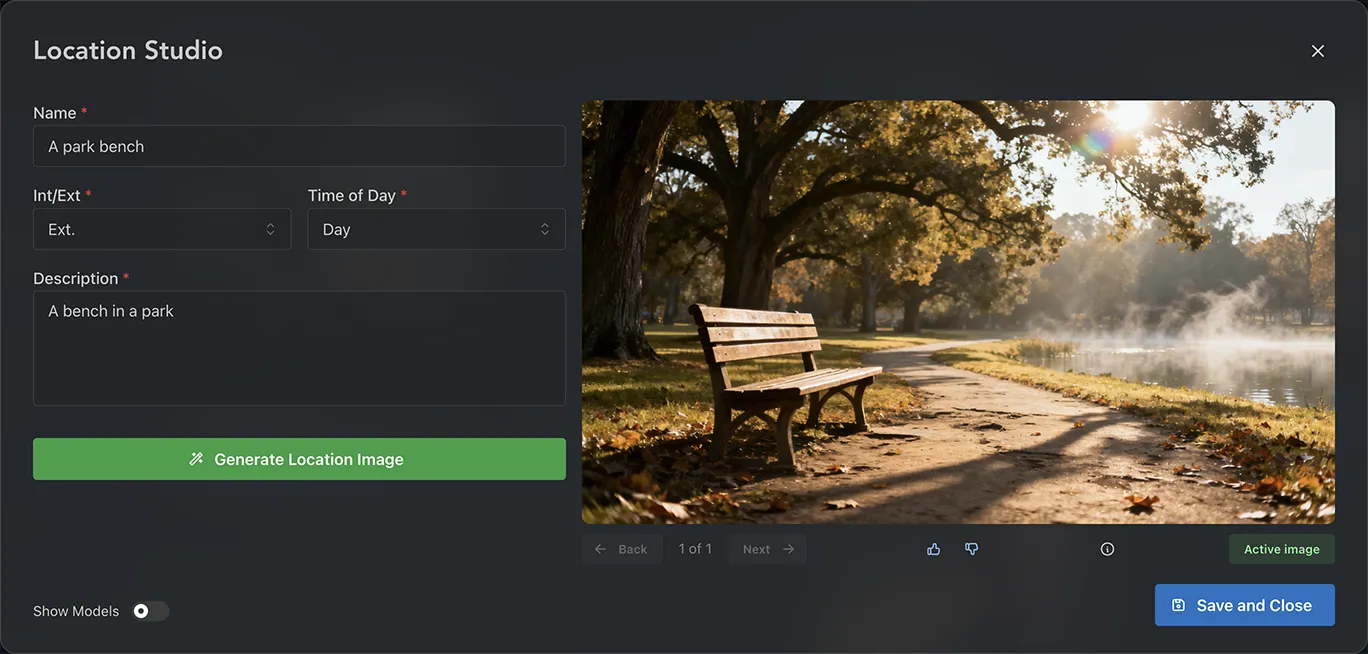
### Step 1: Enter Location Details
* Click **Create New Location**
* Enter a descriptive **Name** (e.g., "Downtown Coffee Shop" or "Mountain Cabin")
* Select **Int.** (Interior) or **Ext.** (Exterior) to indicate the location type
* Select **Day** or **Night** for the lighting condition
* Write a detailed physical **Description** of the location — include architectural details, atmosphere, mood, and key visual elements
### Step 2: Generate Location Image
* Click **Generate Location Image** — your description will guide the AI image generation
* Review the generated image and refine your description if needed
* Generate again until you're satisfied with the result
* Click **Save and Close** to add the location to your project
### Managing Generations
Once you've generated location images, you can manage them with the following features:
* **Navigate through generations** — Use the back and next buttons under the image to browse through all generated versions
* **Provide feedback** — Click the thumbs up and thumbs down buttons to give feedback on generated images
* **Active image** — The active image will be used when creating shots and scenes. New generations are automatically set as active
* **Set active image** — To set a different image as active, navigate to it using the back/next buttons and click **Set Active** underneath the image
* **Hide a generation** — Click the eye button to tuck away a generation you no longer want to see, without losing it. To bring it back, click the show-hidden (eye) button next to the navigation counter, navigate to the hidden generation, and click **Unhide**
* **Delete a generation** — Click the trash button to remove a generation permanently. If you might want it back later, hide it instead
**Advanced tip:** Try enabling "show models" to experiment with different AI models for varied visual styles and quality levels.
### Saving Views
A single location can hold several **views** — for example a wide establishing angle, a tight corner, or the same room at a different time of day. Saving a generation as a view lets you reuse that exact image as the reference when generating a shot's first frame, without changing the location's main active image.
* **Save a view** — Navigate to the generation you want to keep and click the bookmark (**+**) button beneath the image. The view is saved with an automatic name like "View 2"
* **Rename a view** — Click the view's name badge and enter a new name (e.g., "Wide establishing", "Behind the bar")
* **Remove a view** — Click the bookmark-off button to unsave it; the underlying generation is kept, it just stops appearing in the shot view picker
Views are per-location. The location's **active image** acts as the default view for any shot that doesn't pick a specific one. See [Generate First Frame](shot-studio/generate-first-frame) for how to select a view when creating a shot.
> ⚠️ **Important:** You must create at least one location before you can create a scene.
***
Previous: create characters
Next: create props for your scenes
 ### Step 1: Enter Location Details
* Click **Create New Location**
* Enter a descriptive **Name** (e.g., "Downtown Coffee Shop" or "Mountain Cabin")
* Select **Int.** (Interior) or **Ext.** (Exterior) to indicate the location type
* Select **Day** or **Night** for the lighting condition
* Write a detailed physical **Description** of the location — include architectural details, atmosphere, mood, and key visual elements
### Step 2: Generate Location Image
* Click **Generate Location Image** — your description will guide the AI image generation
* Review the generated image and refine your description if needed
* Generate again until you're satisfied with the result
* Click **Save and Close** to add the location to your project
### Managing Generations
Once you've generated location images, you can manage them with the following features:
* **Navigate through generations** — Use the back and next buttons under the image to browse through all generated versions
* **Provide feedback** — Click the thumbs up and thumbs down buttons to give feedback on generated images
* **Active image** — The active image will be used when creating shots and scenes. New generations are automatically set as active
* **Set active image** — To set a different image as active, navigate to it using the back/next buttons and click **Set Active** underneath the image
* **Hide a generation** — Click the eye button to tuck away a generation you no longer want to see, without losing it. To bring it back, click the show-hidden (eye) button next to the navigation counter, navigate to the hidden generation, and click **Unhide**
* **Delete a generation** — Click the trash button to remove a generation permanently. If you might want it back later, hide it instead
### Step 1: Enter Location Details
* Click **Create New Location**
* Enter a descriptive **Name** (e.g., "Downtown Coffee Shop" or "Mountain Cabin")
* Select **Int.** (Interior) or **Ext.** (Exterior) to indicate the location type
* Select **Day** or **Night** for the lighting condition
* Write a detailed physical **Description** of the location — include architectural details, atmosphere, mood, and key visual elements
### Step 2: Generate Location Image
* Click **Generate Location Image** — your description will guide the AI image generation
* Review the generated image and refine your description if needed
* Generate again until you're satisfied with the result
* Click **Save and Close** to add the location to your project
### Managing Generations
Once you've generated location images, you can manage them with the following features:
* **Navigate through generations** — Use the back and next buttons under the image to browse through all generated versions
* **Provide feedback** — Click the thumbs up and thumbs down buttons to give feedback on generated images
* **Active image** — The active image will be used when creating shots and scenes. New generations are automatically set as active
* **Set active image** — To set a different image as active, navigate to it using the back/next buttons and click **Set Active** underneath the image
* **Hide a generation** — Click the eye button to tuck away a generation you no longer want to see, without losing it. To bring it back, click the show-hidden (eye) button next to the navigation counter, navigate to the hidden generation, and click **Unhide**
* **Delete a generation** — Click the trash button to remove a generation permanently. If you might want it back later, hide it instead